As a dedicated Tenno, I've always been fascinated by the ever-changing state of the Sol System in Warframe. While major updates grab headlines, it's the recurring systemic events that truly keep the gameplay loop fresh and engaging. The Razorback Armada is a perfect example of this—a player-triggered event that transforms the starchart and challenges even veteran players. I remember the first time I saw the notification pop up: the Corpus had won enough Invasion conflicts, and the massive, hulking forms of the Razorbacks were deploying. It wasn't just another mission; it was an event that required preparation, strategy, and cooperation. What exactly makes this limited-time boss fight so compelling, and how can you, as a fellow player, make the most of it?
What Exactly Is the Razorback Armada Event?
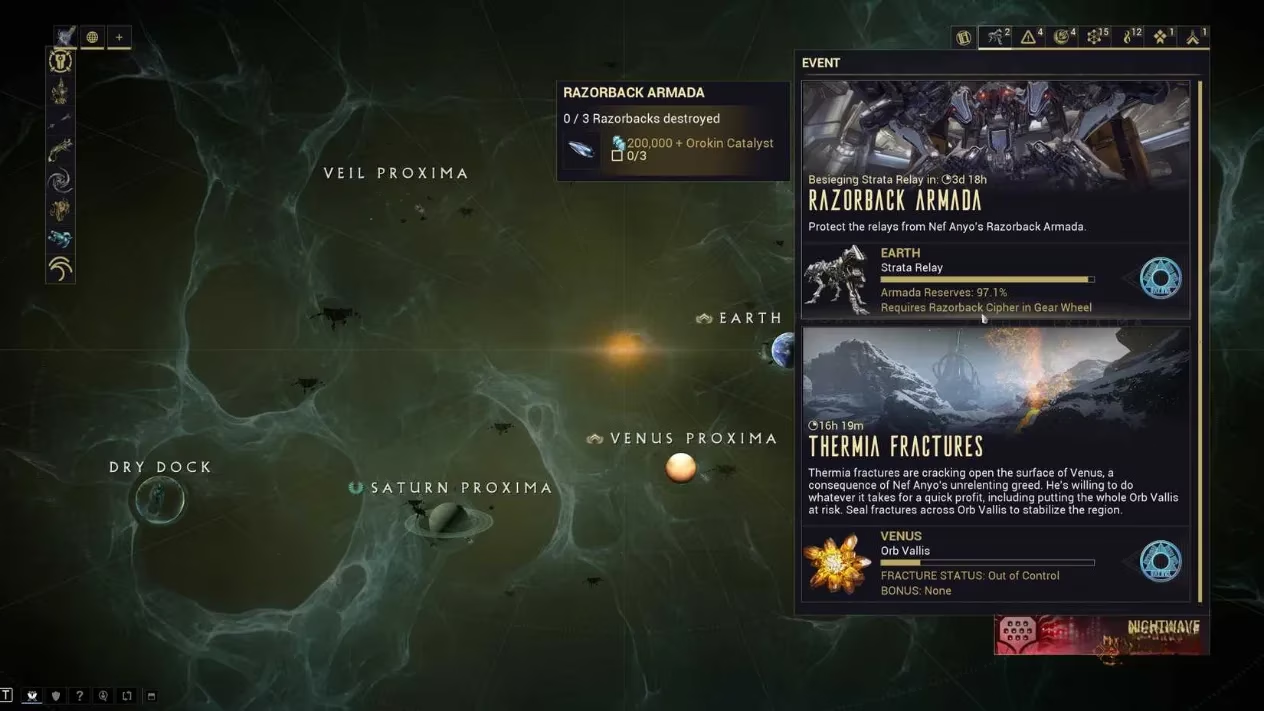
In my experience, the event activates predictably yet dramatically. When the Corpus faction secures a significant number of victories in planetary Invasion missions, the Razorback Armada is unleashed. This isn't a permanent fixture; it's a limited-time boss fight that typically graces our relays every three months and lasts for a thrilling four-day window. The Lotus herself transmits the schematics directly to my Orbiter, signaling that it's time to gear up. The core of this event revolves around a special consumable: the Razorback Cipher. Without it, you can't even access the fight. The rewards are a powerful motivator—my first three victories netted me a pre-built Orokin Catalyst and a cool 200,000 Credits. After that, the real grind begins for the exclusive loot, including:
-
The powerful 120% Puncture mod set (Piercing Caliber, etc.).
-
Unique Archwing elemental/status hybrid mods.
-
Components for the coveted Gorgon Wraith rifle.
Crafting the Key: Your Razorback Cipher
The cipher is your ticket to the dance, and you must craft it yourself. The blueprint arrives automatically; the resources, however, require some effort.
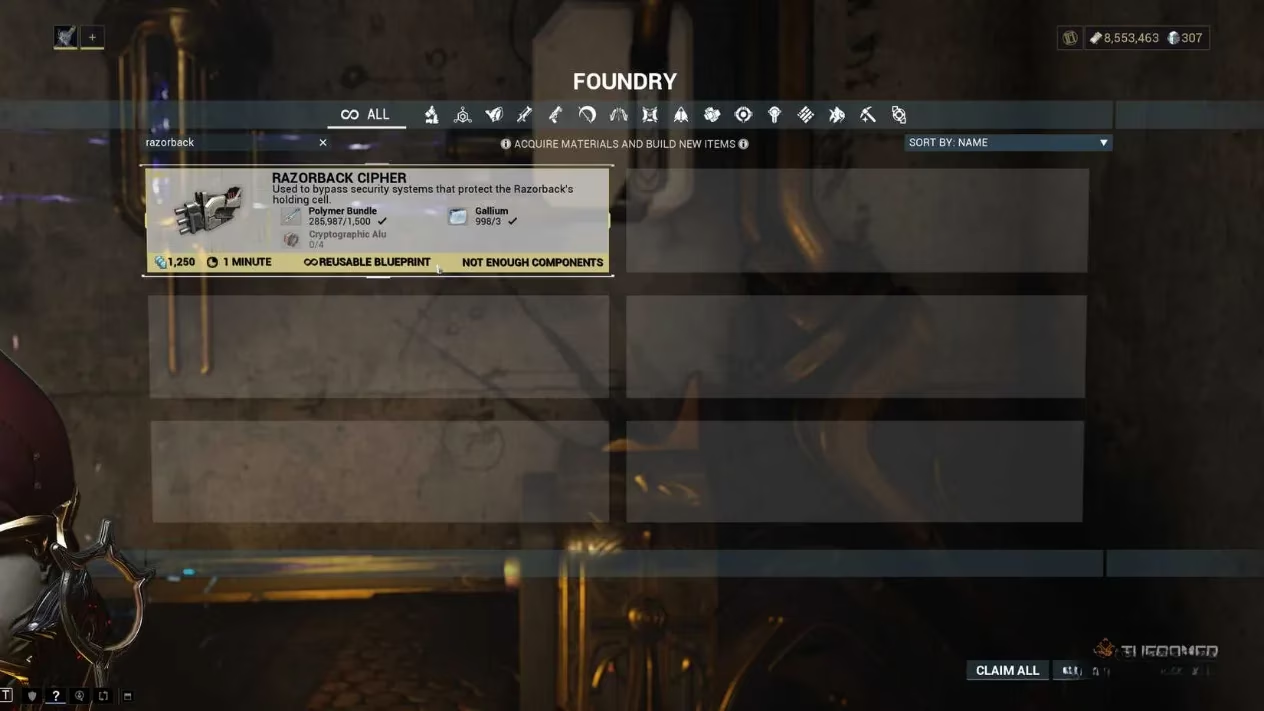
Here’s what I always need to gather for each cipher:
| Resource | Quantity | Notes |
|---|---|---|
| Polymer Bundle | 1,500 | Common on Venus and Mercury. |
| Gallium | 3 | Drops from bosses on Mars and Uranus. |
| Cryptographic Alu | 4 | The event-exclusive material. This is the real gate. |
| Credits | 1,250 | A trivial cost for most veterans. |
| Crafting Time | 60 Seconds | Build it between missions! |
Once crafted, I never forget to slot it into my Gear Wheel in the Arsenal. Each successful Razorback takedown consumes one cipher, meaning I'm often crafting them in batches throughout the four-day event.
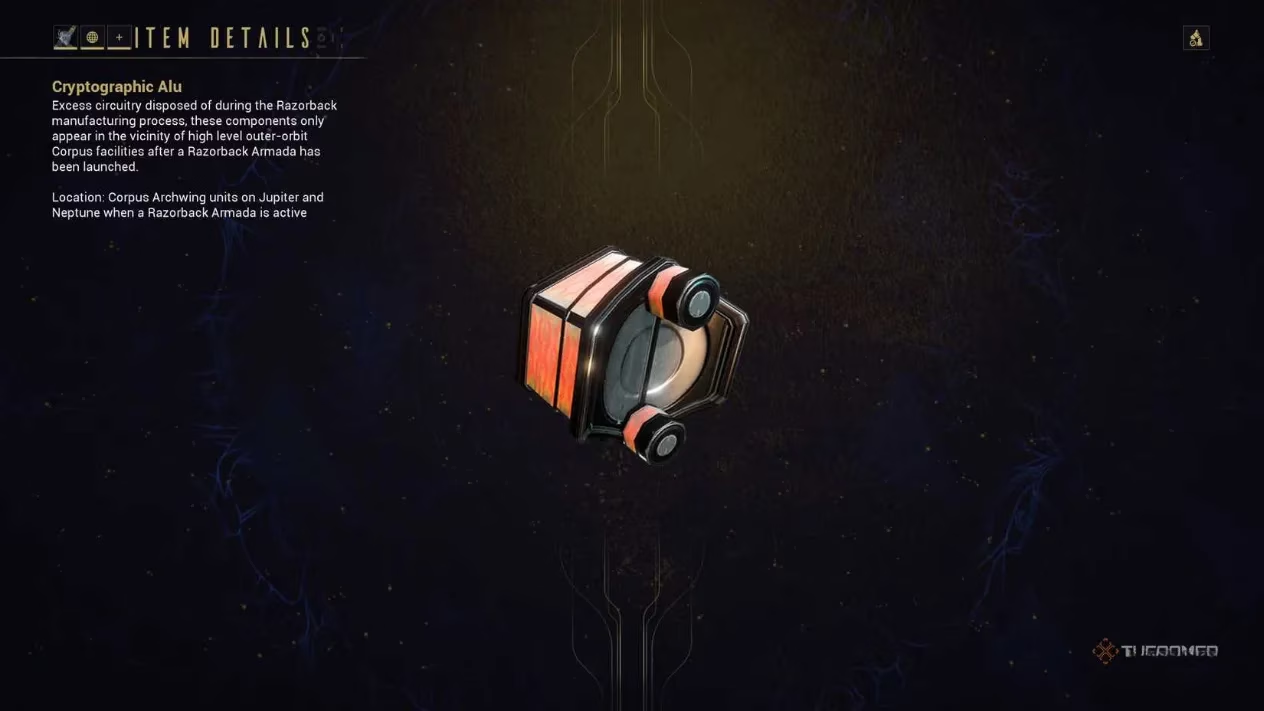
The Heart of the Farm: Cryptographic Alu
This is where the event truly begins for me. Cryptographic Alu is a rare resource that only drops from Corpus Archwing enemies during the Razorback Armada's active period. Where do I find them? Primarily on Archwing mission nodes around Jupiter and Neptune. But here's a pro-tip from my Railjack adventures: if you have your own ship, you can also find these enemies in any Corpus-owned Proxima (Venus, Neptune, Pluto, and the Veil Proxima).
The drop chance is low, but I've learned to stack the odds in my favor:
-
Resource Drop Chance Boosters are invaluable.
-
Warframe abilities like Nekros's Desecrate or Hydroid's Pilfering Swarm (with the Pilfering Swarm augment) work in Archwing? Actually, no—they don't affect Archwing enemies directly. This is a common misconception!
-
The real secret weapon? The Resourceful Retriever mod on your companion. Even though companions aren't active in Archwing missions, this mod's effect strangely and wonderfully still applies, giving you extra rolls for resources.
My Go-To Farming Strategy for Alu
After years of testing, one location stands above all others for efficient Alu farming: Salacia, Neptune. Why? It's a Mobile Defense mission with an enemy density that puts most starchart missions to shame. Defending the satellite means a constant, overwhelming stream of Corpus Archwing units. My loadout for this is always the Amesha Archwing; its defensive abilities make you nearly invincible against the onslaught. No other Archwing node on the Steel Path or normal starchart comes close to Salacia's yield-per-minute.
But what if I'm not in the mood for classic Archwing? My fallback is Railjack. Running quick Exterminate missions in Corpus Proxima regions is a great alternative. My preferred tiles are:
-
Calabash, Veil Proxima (High-level, best yield if you're equipped for it).
-
Bifrost Echo, Venus (Excellent for players still progressing through Railjack content).
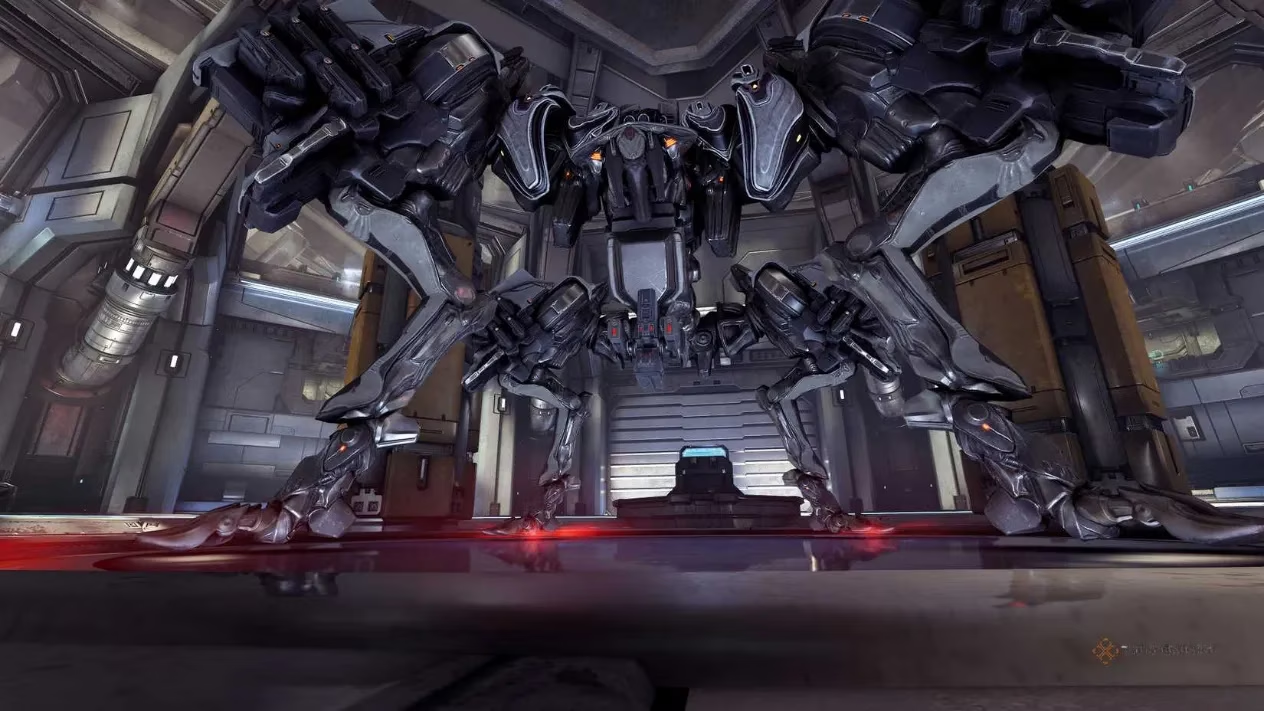
Confronting the Beast: The Razorback Boss Fight
Finally, with cipher in hand, it's time for the main event. The mission structure will feel familiar—it uses the Jackal's arena on Venus—but the mechanics are entirely unique and revolve around hacking and control.
Here’s my step-by-step process for every run:
-
Access: Use your Razorback Cipher on the giant door to enter the arena. Stepping inside triggers the fight.
-
The Problem: The Razorback is initially completely invulnerable. It will also spawn endless waves of Corpus troops. Direct damage is useless.
-
The Solution: Look up! On the upper balconies of the arena, you'll find two hacking terminals on opposite sides. Hack both. This summons a Corpus Bursa onto each balcony.
-
Turn the Tide: Destroy these Bursas, then hack their remains. This ingenious maneuver reprograms them to fight for you. They will turn their massive cannons on the Razorback.
-
The Window of Opportunity: Under the allied Bursas' fire, the Razorback will stagger and slump over, becoming vulnerable. This is your cue to unleash everything you have. Your goal is to remove 25% of its health bar in this short window.
-
Repeat: The Razorback will reset its invulnerability. You must repeat the hack-Bursa-convert process three more times, chipping away 25% of its health each phase, until the mechanical monstrosity is finally destroyed.
The fight is a brilliant test of target prioritization, hacking speed under fire, and burst damage. It perfectly encapsulates Warframe's blend of parkour, shooting, and objective-based gameplay. When the Razorback finally falls and my squad extracts, seeing those exclusive mods or Gorgon Wraith parts in the mission rewards always feels like a hard-earned triumph. The Razorback Armada isn't just an event; for me, it's a quarterly ritual that tests my preparedness and skill, and it remains one of the most satisfying recurring challenges in the Origin System.
Loading comments...